Thursday, September 29, 2011

The chosen one... (Hobbyking.com battery)

After checking just about every possible configuration of Hobbyking.com LiPO batteries to try and fit them into my Tidalforce front hub, I've come across one that would work. It's not quite up to the AH that I was hoping for, but it will definitely fit and reduce the weight of the front end of my iO without affecting the balance of the bike by placing the battery over the rear wheel.

It's the Hobby King 8,000 mAH 5S Lithium Polymer battery.


With a pair of these packs, for an equivalent 10S1P, I can get 37V 8AH which considering the cost ($74 each, $148 a pair) is quite an amazing bargain. They are also capable of very high current output and can be charged with the pair of balance plugs. Gary Goodrum's BMS should be perfect for this setup when configured for the 5S packs and it can simply be placed into the hub with only the power plug extending from the hub itself. Very neat and very powerful considering the cost and size...

More later,
Ambrose

Flat Tire

I had my GoPro with me when I had the flat so I took a couple of photos of the bike while at rest...

 The bike with the rear flat. Strangest flat I've ever experienced I wasn't riding, just parked, checking my battery when I heard a hiss and felt the tail end sink down a bit.

A sad sight.

More later,
Ambrose

Wednesday, September 28, 2011

Saturday morning ride, I mean problems...

I went for a ride Saturday morning thinking that the rain had finally abated just for a little bit. It was great for about 8 miles then everything went haywire. I saw that my battery was dropping in voltage very quickly and that my speed was also dropping rapidly, but I couldn't possibly run out at less than 2AH, could it? When I pulled over to check my batteries, I spotted that parts of my pack were disconnected so I was only getting a few batteries worth of juice. As I was checking the battery, I noticed that the bike dropped in height a little bit. I thought the bike had shifted, but nothing seemed to be moving except for the height! I had a very strange flat tire. I wasn't moving and I didn't have any notion of any problems before this with the tire. Weird!

Anyway, here's the video. When I'm going full speed, I'm going around 36-38 miles per hour which feels really good! Be sure to watch in 720 HD!


More later,
Ambrose

Saturday, September 24, 2011

New Extech EX-330 Multimeter

I've been keeping an eye out for a new meter since my el cheapo meter died a while back. I've always loved Fluke meters but new Flukes are expensive.

After watching this episode of the eevblog, I started looking for one. One popped up on eBay for $30 so I grabbed it.

http://www.eevblog.com/2010/06/04/eevblog-91-50-multimeter-shootout/

Here it is side by side with my old Fluke.
More later, Ambrose

Tidalforce Wavecrest Front Hub Battery Upgrade

I've renamed this blog entry slightly differently from previous entries because I think I've turned the corner on the disassembly of the Tidalforce front hub battery and am now focused on the retrofitting it for new batteries.

In preparation for different batteries, I've made up 3 cardboard dummies (models) of a popular size of lithium polymer battery from www.hobbyking.com to test fit them inside the Tidalforce hub's shell. The size is roughly 150mm x 50mm x 50mm. Many of the LiPO packs from HK are slightly smaller then this size, but I thought it would be better to try and fit the larger sizeinitially instead of a smaller size.
The actual pack I chose for size is this one:
http://www.hobbyking.com/hobbyking/store/%5F%5F9935%5F%5FZIPPY%5FFlightmax%5F5800mAh%5F6S1P%5F30C.html

It's a Zippy Flightmax 5800mAH 6s1p battery. I would need 4 of these in a 2s2p configuration in order to reach the 36v 10AH requirement. 4 of these batteries would be well above that at 44V 11.6AH. As you can see from the photo below, there's one small problem with this scenario!

This pack, more than likely, will not be the pack that i would use. However, it's a typical average size I'll need to figure out how to fit 4 inside the Tidalforxe hub.

More later,
Ambrose
.

Wednesday, September 21, 2011

Tidalforce Wavecrest Front Hub Disassembly Part 5

I tested all of the cells in the pack and found 3 of them that had no voltage. That's how packs break down. All it takes is a couple of the cells to go bad in order for the whole pack to stop functioning since the pack reaches LVC (low voltage cutoff) very quickly.

I numbered them and found 6, 26, and 28 were bad. More later, Ambrose

Tidalforce Wavecrest Front Hub Disassembly Part 4

With the help of the good folks on Endless-sphere.com I was able to loosen the 4 slotted nut holding the axle together and preventing me from removing the NiMH cells. I used a large hammer and a large screwdriver to loosen the nut. I started gently and moved around the 4 slots to try and distribute the energy. In about 3 minutes, I had the nut off!

Now I need to measure the space available and see what will fit into the space. I hope it's a at least 10aH of LiPO! More later, Ambrose

Tuesday, September 20, 2011

Tidalforce Wavecrest Front Hub Disassembly Part 3

I was able to unsolder the 8 leads that connect the NiMH pack from the BMS. The BMS also contains multiple thermal sensors which are on long legs and fit into small openings in the pack. It looks very strange when separated from the NiMH pack itself.

The battery with the BMS removed.

The Wavecrest BMS removed from pack. Note the fuse holders on the lower left and the data connectors near the middle bottom.

 Here's the perspective view of the BMS. Note the tall fuse holders and the very tall thermal sensors that look like little towers. They come in three different sizes. The small orange ones, the gray tall blocks and the very solid large one located near the center circle on the right.

Now the trick is to separate the axle from the NiMH pack so that the plastic housing can be removed. It looks as if the plastic battery holder is sandwiched underneath the axle nut. The axle nut has four slots cut around the outside to hold a special bit of some sort. I could improve a driver for it, but would prefer getting the right tool for it.


More later,
Ambrose

Monday, September 19, 2011

Tidalforce Wavecrest Front Hub Disassembly Part 2

With a hint from Narayan, I was able to drop the NiMH cells out of the hub/case and take a look at the entire battery/bms/holder. It's a beautifully made and engineered battery.

 The circuit board side.

The empty wheel.

The battery side.
 Model part number.

Month stamp.

 Year stamp.

Sharpie marked battery.

Hex head covered with silicone. Remove this with your fingernail to get to the hex head screw. There's another one opposite this one on the other side.


 Hub with tab

 Closeup of circuit board

 Closeup of circuit board

 Closeup of circuit board

The next challenge is to unsolder all of the connections to the NiMH cells so that I can separate the batteries from the BMS board. There are 8 big soldered connections.

I highlighted them with red tape!

More later,
Ambrose

Saturday, September 17, 2011

Tidalforce Wavecrest Front Hub Disassembly

I'm trying to replace the NiMH cells in a front A hub battery. So far, I've gotten the cover off, however, i can't figure out how to remove the actual battery/bms from the battery case/wheel. It seems to be bolted one and I suspect you need a special tool in order to extract it, however, I thought I'd ask first!

If you know how to do this, please drop me a line at:
ambroseliaoATgmailDOTcom
(replace the "AT" with @ and "DOT" with "."

Thanks!


Battery cover

Battery in wheel

Side shot of battery in the wheel.

More later,
Ambrose

Wednesday, September 14, 2011

Wavecrest Labs GIM-150 Charger

Along with the Wavecrest Labs front A Hub Battery, was a GIM-150 36V NiMH charger. This charger is supposedly more reliable than the original metal "Hi-Power" brand charger that came with my Tidalforce bike. It's a two-toned plastic box that's made in Germany with long power and charge leads. I haven't tried it yet.


More later,
Ambrose

Wavecrest A Front Hub Battery

I received a dying front Wavecrest "A" hub battery today. My eventual goal is to replace the dying NiMH cells with LiPO packs of equivalent or greater amp hours. It's in excellent shape. I'll have more photos when I disassemble the hub.

The nice cast cover of the battery with the stylized "WC" I think!

Nice Alex Rim with eyelets.

The power data and charger cables and protector shell.

The tabbed skewer hole for the battery hub.

The Alexrims DM18 double walled 36 hole rim.

The data (L), power (C), and Recharge (R) ports.

Nice side shot of the rim from the non-cable side.

Nice shot of the hub from the cable side.

The part number and serial number (122507 A) Serial number 00366.

The "Made in France" label.

More later,
Ambrose

Friday, September 2, 2011

Ikea Fantast Thermometer

I've been following the thread relating to thermometers on ES for a while and was always looking at an inexpensive way to add internal temperature monitoring of the motor to my setup. I've had the Ikea Fantast for a while now and thought it was the perfect thermometer to add to an ebike.
  • It's inexpensive ($7 USD)
  • It's stainless steel
  • It's got a shielded cable
  • It looks like it could be hacked
  • It has a user settable temperature alarm
  • It has both Celsius and Fahrenheit readings.
  • It can go up to 130 °C or 266 °F!
I finally tried to take it apart last night and found it surprisingly easy.

The probe is a stainless steel tube with the cable going in one end and a knitting-needle type point on the other end. The cable is held in place by a crimp near the exit hole. I used a large pair of pliers and squeezed the crimp to open it up. After a couple of minutes of trying, the crimp was almost gone. I gently pulled out the wire thinking that it might be glued in and found that it slipped right out!


The wire seems to be the sensor! Here's a closeup.

You can see along the thermal insulation, there's a small copper crimp where an extension wire is attached. The extension wire is probably the temperature sensor probe.

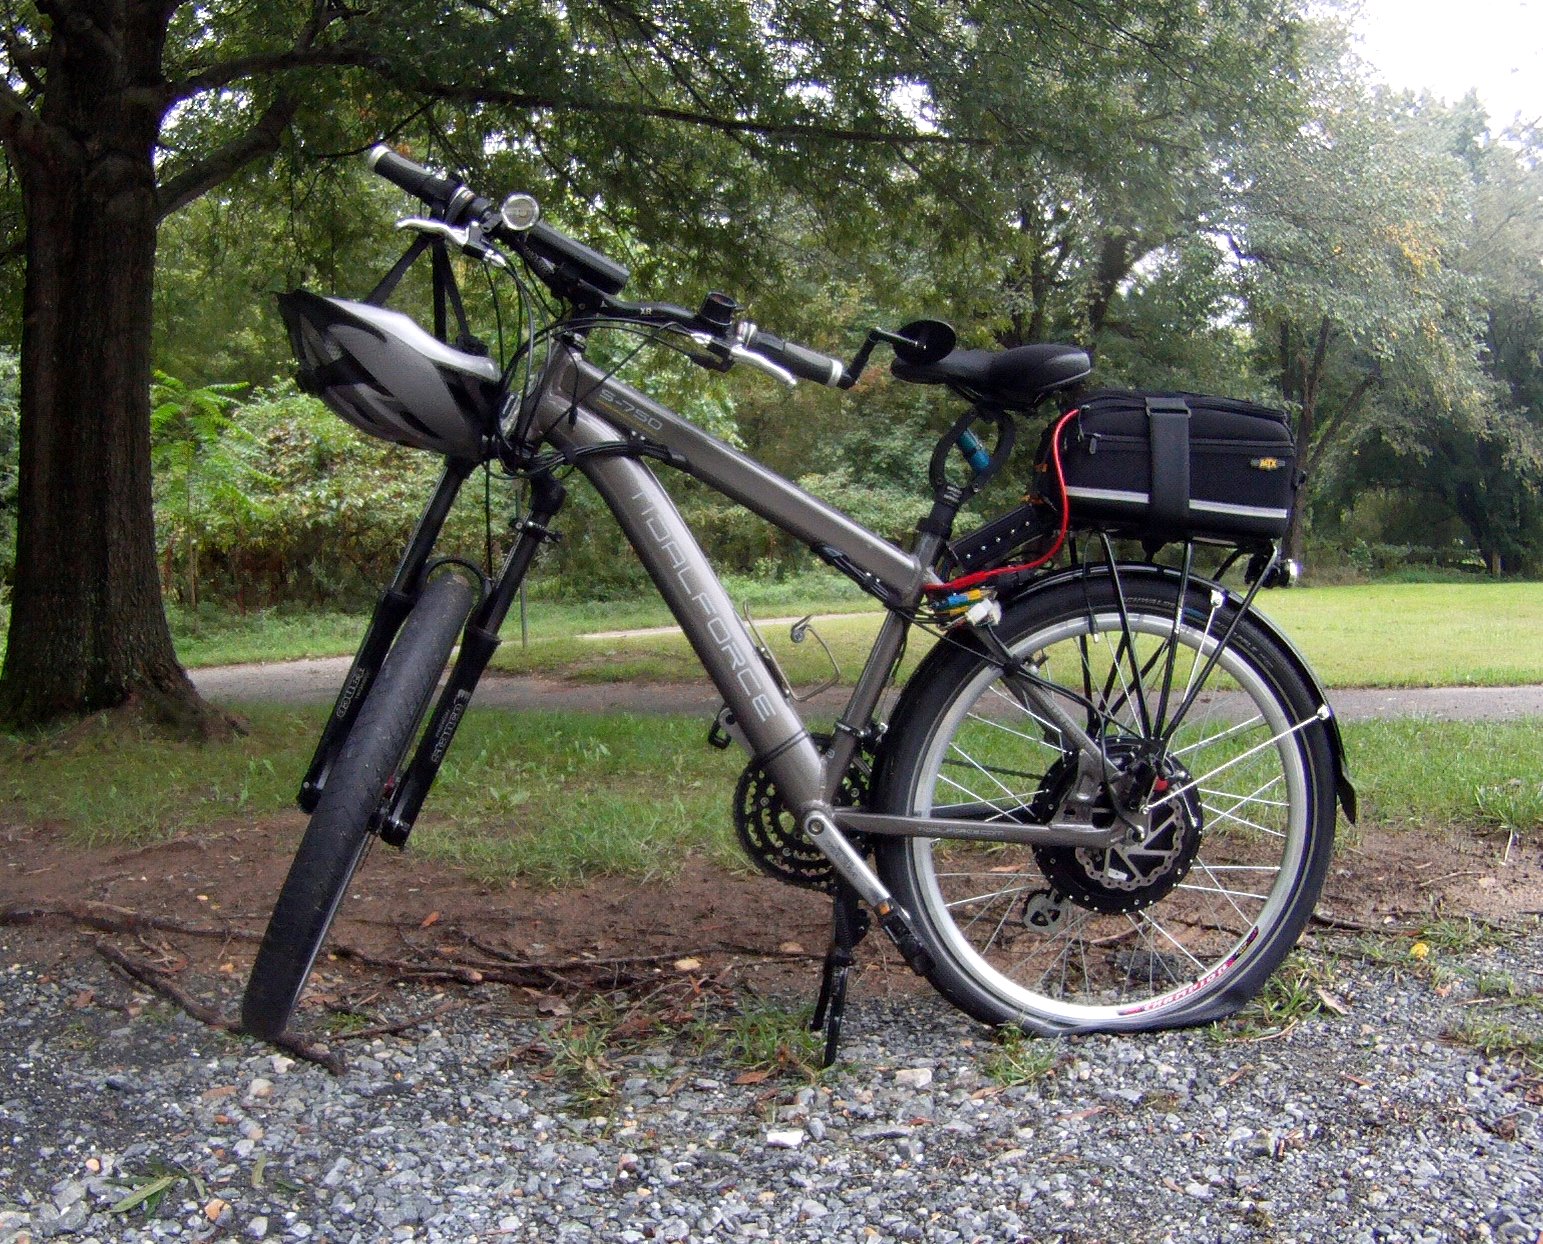
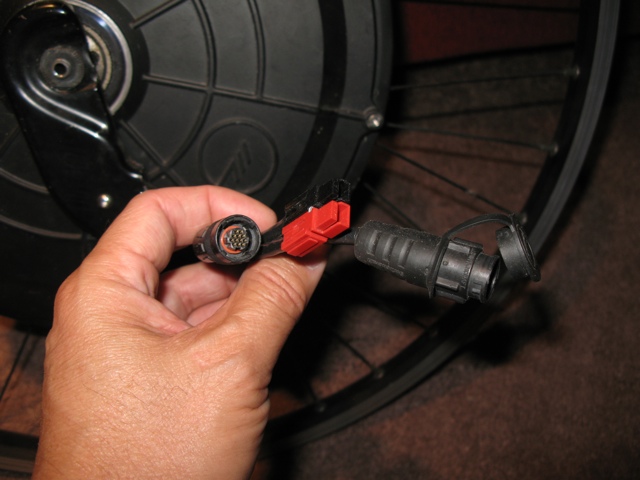
This could be easily attached to the inside of your motor with some silicone caulk and the stainless cable wire threaded out through the axle since it's so thin. You could then mount the display closer to your line of sight and keep an eye on motor temperature. The jack also looks to be a very common size so it may be very easy to extend the length of the cable.

The display unit is also very nice. It's stainless steel with a plastic/rubber bumper around the outside. The display digits aren't very large but it seems adequate.

The display shows current temperature on the left and the alarm setting on the right. 266 °F is the maximum temperature setting and it's probably high enough for ebikers. I don't know if you'd need anything higher since it's 54 °F hotter than boiling water! The three buttons are also very clear and easy to understand. The left button changes the display from °C to °F. The middle button adjusts the alarm temperature up and the right button adjusts the alarm temperature down. There is a U shaped metal stand that can pop out of the back. There's a Timer/Temperature switch. There is also a handy magnet embedded in the back which allows you to slap the display on to anything ferrous. It uses an ordinary AAA cell instead of button cells and does not have an on/off switch which I found troubling, however, I've had the probe for about 6 months now and the original AAA is still going strong.

More later,
Ambrose Liao